Would you like to build your own green roof?
A ‘green roof’ is any roof that is wholly or partially covered with planting.
As well as looking great, green roofs can provide a habitat for wildlife, absorb rainwater, provide additional insulation and reduce overheating.
Green roofs usually consist of several layers including planting in a growing medium spread on to a drainage layer on top of the roof waterproofing membrane.
They can be installed on new or suitable existing roofs.
In 2016, we reconfigured the back of our house, including the renovation of an existing uninsulated balcony roof over an off-shot cloakroom and utility space. We had decided it was a good location for a small green roof as it is overlooked by bedroom windows and is relatively easily accessible from a level area in the garden. The roof faces South West and is 2600mm long x 900mm wide (area 2.35m2).
Our idea was to create a low maintenance green roof, hopefully attracting insects and birds, and to test different types of planting. We spent several months reading around the subject, using text books, magazines and specialist internet sites, plus our knowledge of designing larger green roofs for commercial buildings.
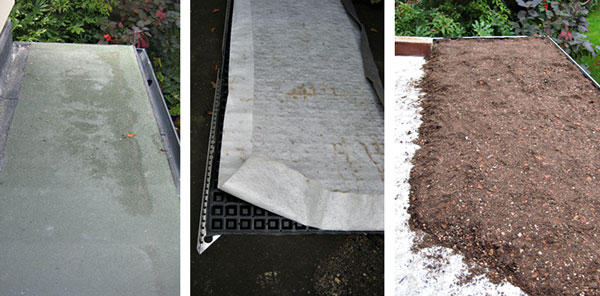
Before we commenced the green roof, our builder removed the railings and tarmac surface and the in-situ concrete slab was fully refurbished to include insulation (depth to comply with Building Regulations) and a fully waterproof roofing layer. We specified a high performance ‘Plant E’ capping sheet from Bauder Roofing which is designed to take a green roof finish; this roof finish is not significantly more expensive than a standard Bauder roof finish.
We set out intending to source all our materials locally, but unfortunately, we simply couldn’t find a local supplier who was able to provide the very small amounts we needed. Therefore, our roof design combines a mixture of proprietary green roof materials from specialist suppliers and locally sourced materials such as timber edging, peat-free compost and plants. The green roof construction materials cost around £250 in 2017, excluding the plants and seeds.
Our shopping list:
From a specialist green roof provider:
Proprietary perforated aluminium edging along the two external roof edges
Proprietary reservoir/drainage layer, an egg-crate shaped black plastic mat sandwiched between a thick fleece base layer and a white filter, size same area as the roof
Recycled growing media
From our local diy superstore:
Treated timber edging length to suit two internal roof edges, to form junction between growing media and pebble strip
From our local garden centre
Black filter fabric
Large pebbles
Peat-free compost
Plants and bulbs
After research, we decided to make up our own growing medium using a combination of proprietary medium and peat-free compost with the aim to achieve a relatively nutrient poor, free-draining substrate to support a robust plant community. The proprietary medium comprises composted organic matter, recycled crushed brick, lightweight aggregate and pumice. The compost was organic and peat-free. We ordered 7 bags of growing medium and 1 large bag of compost (proportions roughly 1: 3.5) which we mixed proportionately before lifting up onto the roof to give a general thickness of about 70mm, deeper towards the back.
This project took two people two long days with many trips up and down a ladder. Before you start building something that requires ladder access, you need to work out the most efficient and safe ways of working. We decided to do as much as possible on the ground before lifting anything up onto the roof.
We measured and cut the aluminium edging and drainage layer at ground level to reduce working at height. The combined reservoir/drainage layer, comprising grey fleece layer (visible on left hand side) on the bottom, plastic ‘egg crate’ drainage layer with white filter layer on top was easily cut to size with a Stanley knife.
We took the decision to use an additional thin black-coloured filter layer between the reservoir/drainage layer and the roof edging instead of overlapping the white filter layer; this was purely a decision based on how it would look from the ground through the perforations in the aluminium edgings and from above. This filter layer was bought on a roll from a local garden centre. At the end of the Day 1, we loaded about 40% of the growing media onto the roof to a depth of about 70mm overall; compacting by foot as we went.
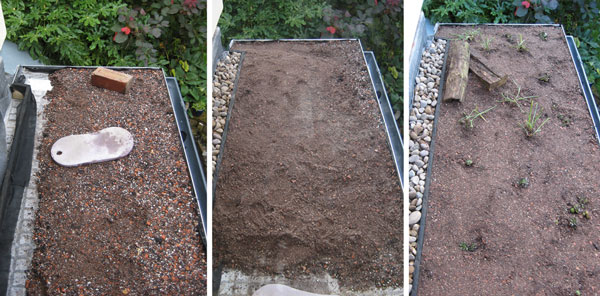
We cut treated timber edgings to form the edge of the pebble strip against the house which is supported in place between the pebbles and growing medium. The grey fleece layer was wrapped over the roof flashing before the pebbles were added and the rest of the growing media was brought onto the roof.
We stapled some more of the thin black filter layer over the timber edging to prevent the growing medium migrating into the pebble strip which we think looks neater from above. To ensure the timber edging stayed in the correct location, we brought up the rest of the growing medium and pebbles in alternative lifts. The growing medium was then manually compacted before the initial planting started.
We placed two fairly rotten sycamore logs from the garden towards the back of the roof to provide initial ‘landscaping’ on the bare roof and create shelter for insects. We planted the roof to try out different types of plants and planting methods. To start with, we decided to plant chives (Allium schoenoprasum) and houseleeks (Sempervivum) which we already had in a garden pot to give us some immediate interest. In addition, we sourced a small amount of UK wild flower and grass seed mixtures for green roofs, keeping 50% back for sowing again in Spring if necessary. The seed was broadcast across the roof at the end of the day.

We continued to add more of the original seed plus smaller alpine perennials. Despite broadcasting a large proportion of grass seed over the roof, it did not take over, whereas Birdsfoot Trefoil (Lotus corniculatus) from the seed mix proved a bit of a bully but provided great colour in late summer. The Allium and Muscari bulbs took very well. Our green roof plants grew rapidly in the warm early season, then suffered in the summer heat and the lack of rainfall. In August, just as the weather turned, we had to intervene and removed and cut back the larger plant material to expose the plants underneath; the growing media was extremely dry and friable.

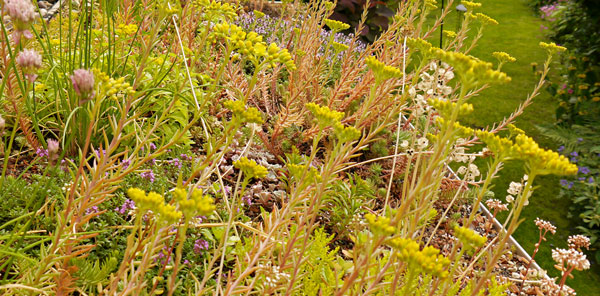
In order to respond to the ‘boom and bust’ planting, in autumn 2018 we decided to switch to planting to predominately Sedum species and low-growing drought tolerant alpines, all sourced from local garden centres. Within a couple of weeks, the Sedums had begun to anchor onto the growing media and by spring/summer 2019, the new planting and original bulbs were growing well.
Since 2020, we have plugged a few gaps with a couple of new sedums and sedum cuttings from elsewhere on the roof. With limited maintenance the roof is now pretty much self-sustaining on what seems to be dry growing media. Over the last two years, the bulb and sedum flowering has been amazing, attracting insects from March with Iris recticulata through to late flowering Sedum in October.
The hot summer of 2022 was fantastic for the roof with amazing long-lasting flowers and foliage. However, the damper, duller summer of 2023 has brought some moss and a few weeds which need to be addressed during 2024. Interestingly, the best performing areas of the roof are those with thin and poor growing media, so we are going to investigate planting some small shade-loving alpines in areas of deeper media.
Building and growing your green roof is not an overnight project; like gardening generally, you need some patience and be willing to learn from your mistakes. In our opinion you do need to expect to carry out some maintenance, if it's only to remove weeds once/twice a year. However, it’s entirely been worth the effort and research and now we encourage everyone else who might have a new or existing roof or balcony to get involved!
Plants for a green roof need to be chosen which suit your roof's particular orientation and location. Listed out are the main plant varieties with which we have had success over the last 8 years.
Sedums:
Herbs and Alpine Plants:
Bulbs:
We would recommend the following book as the starting point for your green roof project:
Small Green Roofs: Low-Tech Options for Greener Living by Nigel Dunnett, Dusty Dedge, John Little and Edmund C Snodgrass, Publisher: Timber Press