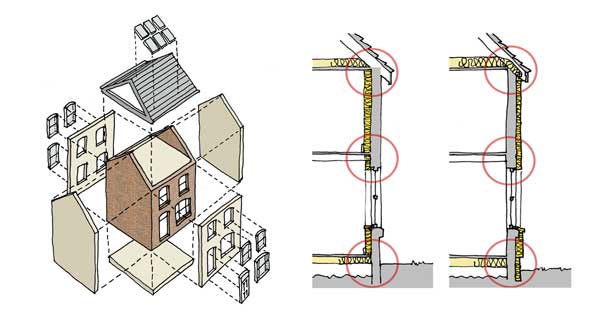
If you are looking to improve the thermal performance of your home, there are some easy first items to do such as draughtproofing windows and doors and adding additional insulation in the roof or loft-space. Replacing windows and doors can be expensive and requires some care in choosing the right products and installer, but should be a relatively straightforward thing to have done. Beyond these items heat loss though the external walls may be a major factor and a big contributor to high utility bills but requires careful consideration of the possible alternatives. It may also involve significant disruption to your house.
Before deciding how to insulate the external walls it is important to have a good look at the condition and construction of the existing walls first. Any damp problem issues will need to be rectified first as these could be increased when insulated. The arrangement of the walls and the junctions with roofs, ground and other building elements will also make some methods of insulation more effective and cost-efficient.
One of the most important aspects of insulating is to achieve as much continuity of the insulation as possible. A ‘cold bridge’ is any area in a building where a gap occurs in the insulation, for example where the roof insulation doesn’t quite meet the top of the wall insulation or where wall insulation is discontinuous because of a wall running into it. The more insulated the house is made, the greater the proportion of heat is lost at these cold bridges. Also, as these areas will be colder than the main areas there is a greater risk of condensation forming on the inside wall surface which can lead to mould.
it is important to have your walls inspected by a professional to identify the existing construction and assess the possible solutions. Contractors often only specialise in one or two systems, so although they may be experts in their products they may not have much knowledge of other alternatives. It may be necessary for you to talk to a number of different contractors or employ an independent consultant to help you.
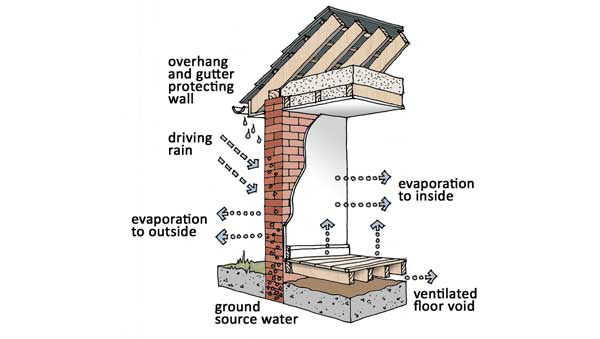
The vast majority of houses in the UK are brick, stone or concrete masonry construction so this article will concentrate on these but if your house construction is different, it will require a more specific solution.
There are three main ways of insulating existing external masonry walls:
• Cavity Wall Insulation (CWI) inserted into the internal cavity of the wall if there is one
• External Wall Insulation (EWI) applied to the outside face of the building
• Internal Wall Insulation (IWI) applied to the inside faces of the external walls within rooms
AIf the external walls have a cavity and it hasn’t yet been filled with insulation, it’s usually a good thing to do as it’s the least intrusive and usually the simplest method of insulating a wall. It can give a significant improvement to the thermal performance of the wall without affecting the external appearance of the building or requiring internal changes however, it must be carefully considered and the correct solution chosen for your particular conditions.
There are many systems available including expanding foams and filling with blown particles such as polystyrene beads or cellulose but it is important to get a solution suited to your building and installed by an approved and skilled contractor, trained in that particular system. They are usually installed by drilling a series of holes from the outside through the outer leaf of brick or stone, then blowing the insulant material into the cavity. To get the insulation into all the nooks and crannies some systems are better than others at filling around window openings and into complicated geometries. Many systems should not be installed in walls that are exposed to driving rain as filling the cavity with insulation could cause routes for wind-driven rain to get to the interior and cause dampness.
Most uninsulated cavities will only be around 50mm wide, so the insulation thickness will be limited to that. Insulating in the cavities does give continuity across junctions with internal walls which can be a major problem with internal insulation solutions, but many older cavity walls will also have returns of solid masonry with no cavity at some points such as around openings to doors and windows, and these will leave cold areas on the internal wall surface.
Although filling the cavity can significantly improve the thermal insulation of the wall and therefore reduce their heat losses it will not get near the levels of insulation required in new homes or by ‘Enerphit’ standards or similar. To increase the insulation of a wall further, it may be used in addition to either internal or external wall insulation.
Cavity insulation materials vary considerably in their thermal efficiency and if poorly installed most can create problems. Cavities were included in house walls to separate the wet outer leaf of masonry from the inner dry leaf, so if the cavity fill insulation creates any pathways between these leaves this can lead to damp penetrating to the interior. These problems are usually down to installation issues such as incorrectly spaced installation holes creating ‘shelves’ within the cavity or cracks in the foam but may be due to installing into a wall that is too exposed to driving rain. Poor installation can also lead to ‘cold spots’ in the walls where insulation hasn’t filled all the cavity leaving gaps, often at corners or around windows or doors. This can be checked by use of an infra-red camera and some contractors will offer this as a post-installation inspection to show the insulation has been correctly installed.
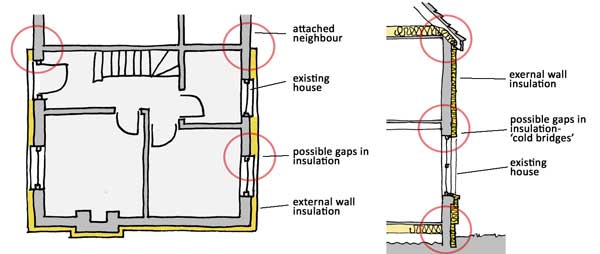
If you don’t mind changing the appearance of your home, external wall insulation (EWI) would often be the preferred option for ease of installation, cost and for not reducing internal floor area in your rooms (as you would if insulation was added to the inside of your walls). With EWI you are wrapping an ‘overcoat’ of insulation around your existing walls, which will require a weatherproof finish added to the outside. This means that the look of the house will be substantially altered so the brick or stone will be completely covered by insulation then a new finish applied over this, typically a render (external plaster). Other finishes can be applied over the insulation such as timber boarding or other forms of metal or panel cladding.
It is much easier to achieve a good EWI result on a detached home where it can be entirely wrapped in the new insulation. If your house is semi-detached or part of a terrace it will adjoin another property that is not being insulated at the same time adding external insulation to your house may leave an awkward junction where the new finish of your insulated elevation stops at the property boundary line and meets the unimproved front of the neighbour. This may look odd but will also probably result in cold areas within your home due to your neighbour’s areas of cold wall just beyond the line of your new insulation.
This insulation is typically a high-performance foamboard such as expanded polystyrene (EPS) which has a good cost-to-thickness ratio (particularly the ‘grey’ type with added graphite), is easy to install without gaps and provides a fairly solid base for a render finish. There are a whole range of alternative foam boards some of which may be thinner but are more expensive. Other insulation materials are available such as mineral wool or wood fibre board which can have the advantages of lower embodied carbon and more vapour permeability, but as these typically are less efficient insulators they need to be much thicker to achieve similar insulation values and may not be as robust if knocked.
Sand cement render finishes are cheap but are prone to cracking and failure. Usually, a thin coat acrylic render system is used as these can accept some movement without cracking, can be self-coloured so they don’t require painting and can even have a silicon finish that repels dirt. There are also more traditional lime-based renders which can also accept some movement without cracking and are vapour permeable, so are suitable for use on vapour permeable insulation. The most important thing is not to randomly mix and match products but to use render and insulation as a complete system tested by a manufacturer to be used together.
The installation of EWI systems can be very straightforward and is done entirely from the outside. The complete wall is covered in foam insulation boards attached to the existing walls with plastic pins, including thinner boards around the reveals of openings for windows and doors. Some systems then require a layer or mesh sheet to achieve good adhesion of the render coat (or coats) which are then sprayed on. A through-coloured finish coat will not require additional painting and will reduce future maintenance.
A EWI installation will add at least 150mm thickness onto the outside wall, so requires this amount of room at property boundaries etc and needs the existing roofs to have at least this much overhang to give a water-resistant top detail without expensive remodelling. Anything fixed to the walls such as rainwater pipes will also need refixing spaced off the wall. The detail at the foot of the wall will also need consideration to maintain the continuity of insulation and may require a different insulation material below the external ground level.
If you want to use a EWI solution it is always a good idea to use a complete system with all elements of insulation and finish provided by a single supplier and installed by a specialist.
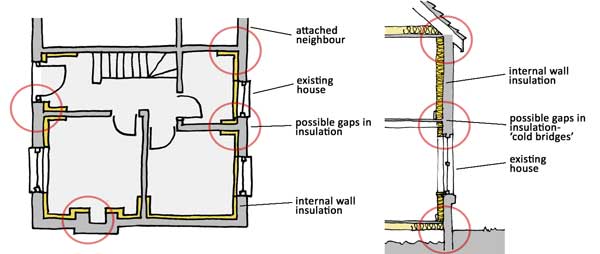
There are many situations it is not desired to change the external appearance as dramatically as external wall insulation will. If you have a brick or stone front elevation facing a road you may not wish to change this appearance and even if you do want to, it may require planning permission. It may be easier to use internal wall insulation (IWI) on a home attached to another, as you can more easily isolate your house from your uninsulated neighbour. It can be more difficult to achieve a highly insulated building due to limited space available for insulated linings and often unavoidable cold bridges.
Installing IWI is very intrusive as it will require refixing of anything fixed to the walls being insulated including skirtings and other trims, electric sockets and wall lights, and if the room has internal features such as ceiling coving or cornices these will probably need to be removed. It is easier to install well in empty houses or as part of a major retrofit as it may require the removal of areas of ceiling and floor to achieve the critical continuity of installation.
Insulating the inside surface of walls will reduce the size of your rooms, as the insulated linings can take up a substantial strip of floor area. With IWI the maximum possible insulation is often limited by the amount of floor space you are willing to lose, so using more efficient insulation materials will minimise the increased thickness and reduce the loss of floor area.
Where an internal wall or floor butts up to the insulated external wall, there can be gaps left between the insulation on either side and therefore cold bridges. If there are fireplaces in the external walls these can be very difficult to completely insulate from the inside without leaving gaps. At windows, the insulation needs to return into the jambs to create a continuous layer of insulation, but it can be difficult to get enough thickness of insulation into the reveal without overlapping the entire window frame width. These cold bridges may need to be managed by getting just enough insulation thickness at these points to prevent condensation and therefore mould growth.
s the insulated internal linings can't usually carry much weight, anything heavy that is fixed to these walls such as shelves, wash basins and kitchen cabinets will need to be fixed through the insulation and into the solid wall behind.
There are two main approaches to IWI installation using either a vapour-permeable or vapour-sealed construction and both solutions require careful consideration to control condensation within the construction. If the IWI system uses vapour-impermeable materials, any condensation or dampness within the wall construction may not evaporate and can be trapped, which can lead to damp patches and mould growth. To prevent condensation from occurring within the construction requires installing a continuous vapour control layer to prevent water vapour from the relatively humid interior ending up condensing within the construction. Some insulation systems are vapour-permeable and allow the wall to ‘breathe’ by letting some water vapour safely pass through, but care must be taken to ensure all elements remain permeable and that there isn’t dampness coming through the wall from the outside.
Most insulated plasterboards have impermeable foam insulation so it is necessary to have an additional impermeable vapour control layer. In an existing building, it may be difficult to maintain a continuous barrier at points such as where floors or internal walls meet the external wall surface that is being insulated - a lot of wrapping and taping can be required to seal around floor joist ends etc.
Some insulation such as wood-fibre boards are vapour permeable and so have the capacity to diffuse any dampness trapped within the construction into the inside of the building. A typical construction would have the insulation boards adhered to a plaster finish on the wall, then another layer of vapour-permeable plaster on the boards as the internal finish.
To keep the quantity of moisture down to manageable levels there must be a completely dry inner face to the external wall with no dampness coming through from the outside, even if it is exposed to driving rain. It also needs a well-ventilated internal environment to remove the moisture so It’s more reliable in a house with whole building mechanical ventilation.
Woodfibre is a much less efficient insulator than foam and only provides about half the insulation value for the same thickness board, so you will either need twice the thickness or have to settle for less insulation. Woodfibre insulation is usually installed tight to the existing wall surface to avoid leaving unventilated voids so the wall surface may need re-finishing to achieve a flat and level background. It can also be more difficult to achieve an adequately insulated detail to window opening reveals. While it still needs to be fitted tightly around floor and ceiling joists it requires less complex sealing.
The English Building Regulations Part L1B currently states that if installing dry lining to the inside face of an external wall, the insulation must be upgraded to achieve a U-value of 0.3Wm2K ‘where functionally technical or economically feasible’. For the Building regs U-values to be waived it must be shown to be uneconomic, either by not providing a simple payback over 15 years or by taking up more than 5% of the floor area of a room (which is unlikely to be reached below 100mm overall thickness).
To achieve a Building Regulations compliant dry lining achieving a U-value of 0.3 Wm2K, on a typical solid brick or stone wall it would require adding a damp proof membrane, timber battens and a foam-backed plasterboard totalling around 90-100mm overall thickness. This can be a significant loss of internal floor area. Instead of using battens the insulated plasterboard could be fixed on dabs or onto a rendered wall surface and save some thickness if you are sure the internal walls will be completely dry, but it’s a risk on an exposed external wall. Using woodfibre boards instead of foam boards, it would need over 150 mm total to achieve 0.3Wm2k, quite a large area to lose off most rooms.
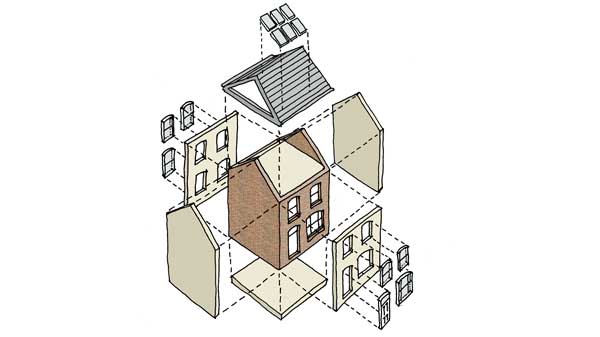
• If you have a cavity and your walls aren’t too exposed cavity wall insulation should be the simplest and easiest to achieve a significant improvement, but won’t achieve very high levels of insulation unless it’s combined with additional IWI or EWI
• If you don’t mind completely changing the look of your home (and if you are allowed to under Planning rules) EWI is usually the most efficient solution for achieving a highly insulated home.
• Where EWI cannot be used IWI can achieve good results if you can accept the internal disruption. but requires careful design and installation. A vapour-permeable solution would be preferred if practical.
Sometimes neither option is entirely right and it’s necessary to use a combination of strategies. If it is undesirable to change the external appearance of the house internal IWI might be required for the front of the house facing a street but the simpler and more efficient EWI could be applied to the outside of the walls around the back or sides where it is less visible.